11 tips for Growing a Facebook Group
Updated: November 13, 2020
Facebook Groups are in continuous development. I believe that they will become more and more useful.
Not only for those that want to sell through a Facebook Group, but also for those that want to create a Facebook Group community. Either way, you may want to know some ideas about growing a Facebook Group.
Letting your Facebook Group grow by itself it's definitely not something you should do, because nothing will happen. I will give you some tips for growing a Facebook Groups, tips that are easy to do and apply. They involve some settings that you should do to your Facebook Group, and some actions that you, as the admin, should do.
Be involved
Creating a Facebook Group shouldn't be about just the ‘creating' part. I've said in this article that you have to be aware that if you create a Facebook Group for business or for your side-hobbies, be aware that it will be a long-term project. Of course, if you don't want to grow your Facebook Group or you don't want to promote it or you just created it for fun…then do whatever you consider.
But a growing Facebook Group should have you, involved. What does that mean? Being involved in a Facebook Group means that you have to communicate with your members on a daily basis. Don't suppose that just inviting members will be enough, and they will do the work after. People will not start to talk unless you do. Engage them in various types of discussions.
Help your members with answers when they struggle with something. But pay attention to this: for a new group, it is OK to always try to answer first. After that, start tagging members to help them see the question and make them answer. Basically, teach your members it's OK for them to give advice to their fellows and to answer their questions. As your group is getting bigger, observe this whole process – you'll be happy to see that your group's members will easily communicate with each other. But don't think you are not needed anymore! At his point, you must:
- give reactions to the post or to the comments;
- write your own opinion or idea;
- help your members when you see they need it;
- comment, thanking the members that took the time to answer.
By doing these, you'll see that you'll have more and more members that will know the drill and that will be happy to share their ideas and start discussions. You will have to only be involved in their discussions and let them see that you are there for them.
Do something special for your members
Your members have to see that you care for them. People, in general, enjoy feeling special. This is why you should think of ways of making your Facebook Group members feel good an special.
There are two ways you can go with this, and I will detail them right away.
- It can happen that one or a few of your members be more active than the others. They answer quickly, they start a discussion, they give the right advice, and so on. Observe them, and pick a day in the month (or in the week) to thank your active members. Tag them in a post and say why are you thanking them. You can make this a habit, and every week or every month, gather your notes and thank the members that did the best job in your group. Yes, it is just like in school, but this practice is used even in companies. As I've said, people enjoy feeling special and having some attention just for them. It will make them do more, and constantly;
- Depending on your possibilities, consider giving something to your Facebook Group members. It can be some freebies, some checklists, whatever you can do in order to help them. Plan it as a monthly surprise, or pick a day of the week when you'll always give them something. Make sure these ‘somethings' are free. At the very least, ask something in return: if you help me, I'll give you this.
Be the leader, not the boss
I'm sure you know about this saying. Yes, it also applies to a Facebook Group, as you are the admin, you created the group, the group is yours. You know that for a company to develop and grow, there must be a leader that helps his colleagues (yes, I said colleagues instead of employees; only a boss uses that term (employees), in my opinion).
Guide your members; help them see you as an inspiration. You most certainly don't want them to see you as a person they're afraid of. Yes, you must be respected, and you do this by taking firm action if someone breaks the rules of the group.
Being afraid of someone does not help the growth (of a group, of a company, of a community). It can be productive, but you don't want and you don't need someone that ‘work from 9 to 5'. Your Facebook Group needs ideas, needs inspiration. If your members are afraid of you, they will be afraid to share their ideas about something, to communicate with others, and so on.
If it happens that someone really gives a wrong answer to a question, be sure to explain why it was wrong, help to understand the correct answer.
Establish a purpose for your group
Establishing a purpose for your Facebook Group should be one of the first things you must do.
- Why do you want to create a Facebook Group?
- What do you want to gain?
- What's the main topic?
- Do you want a big community or a small one?
- Will you plan to keep this group for a long time?
- Are you capable of totally involving yourself in this group?
These are just a few questions you must ask yourself. Write all of your answers on a sheet of paper or in a document. Analyze them and try to capture the essence. You'll see that it will be easier for you to create your Facebook Group and to grow it. That is just because you'll know exactly what you want.
You should revise your answers from time to time, or add some other questions. Keep your purpose current, and you'll have a smooth experience.
Use reminders for your members
I'm certain that at some point in your life you forgot to do something, and you started to use post-its. Nowadays, our smartphone is of great help as you can remind yourself to do something not just at a specific hour, but at a specific location, too. It's really useful as you don't have to constantly load your memory or to be stressed that you will forget something.
Yes, Facebook Groups has notifications and you can also pin to the top the important posts, but that doesn't help you very much. If you need your members in something (e.g. give an idea, download a freebie, participate in a discussion, and so on), make sure you remind them. Use approximately 3 reminders, but change the number as you want. Something you'll only need 1 reminder, sometimes you'll need 4.
Nonetheless, some members will feel annoyed about these reminders, that is why you should make sure you insert some apologies. The other members will thank you for the reminders! Maybe they saw your post when they were commuting, or when they were at work. They didn't have time to take action right at that moment, and after that, they forgot, even though they really wanted to participate in whatever you were posting about. Give them another chance, and set up some reminders. Everybody will benefit from this.
Post about various topics
I'm sure you don't want to bore your members. OK, that is a bit much to say, but you definitely want your members to know that your group can help them regarding other subjects, too. Even though you've created a group that has a certain subject or theme, don't be afraid to tackle other topics. You can choose a day of the week and call it ‘surprise discussion'.
This idea will help with engaging your Facebook Group members, as they will be interested in finding out more about that particular subject. Besides, you'll never know how many experts you have in your group. Maybe someone knows much about cosmology, therefore will be happy to help others better understand the stars. It will be a fun thing to do, not only for your members but also for you.
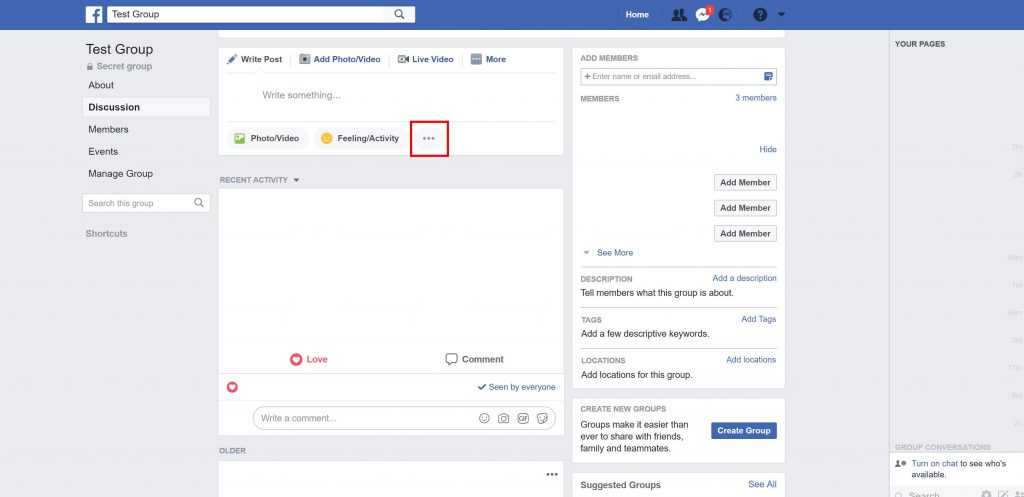
In case you don't know what subject to post about, or in case you want to content as many members as you can, you can create a poll. Write several options at the beginning of the week, remind people to choose one, and see what your community wants.
Just go to your group and check the input text area of sharing a status for the three dots button. There you'll find the option for Poll:
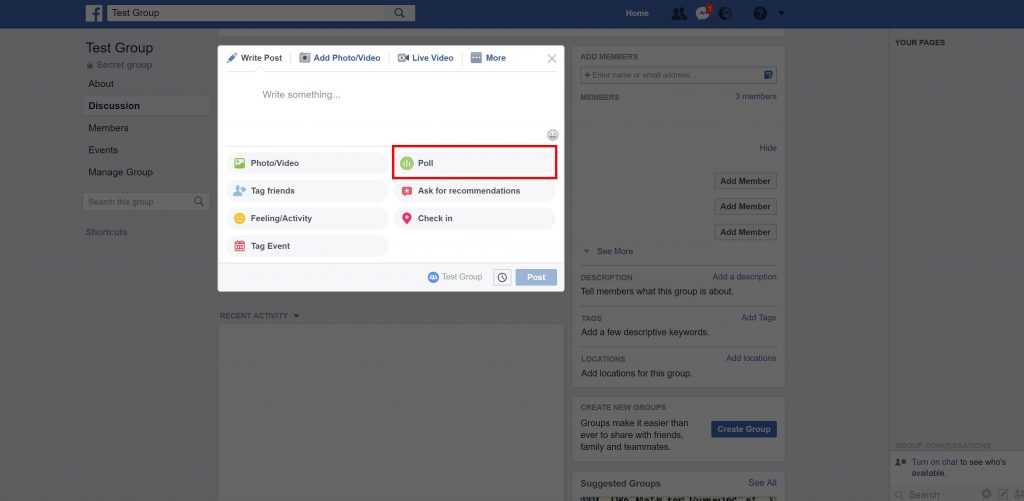
Write your question, add some options. You can also let your members add their own options, by clicking on the button in the left corner.
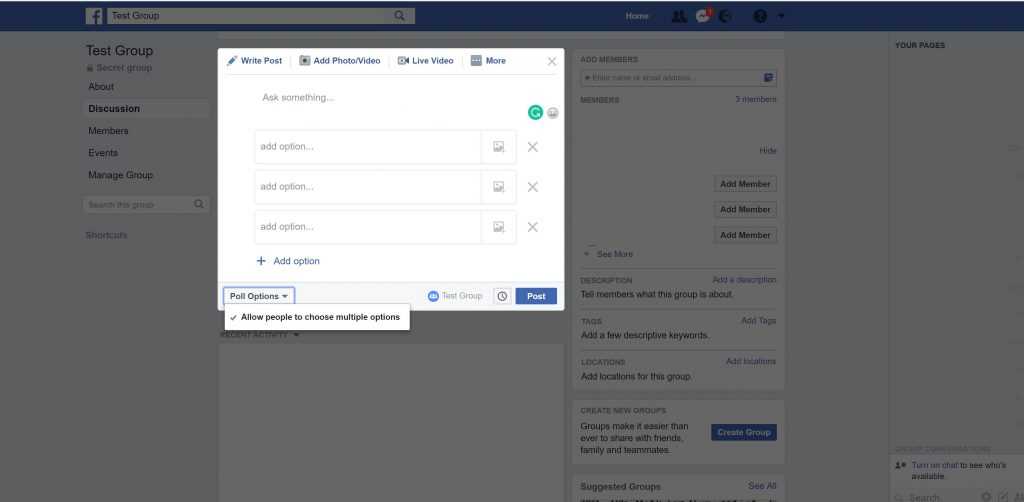
I don't advise this, as it can become a very disorganized post and you'll find nothing relevant. It's better to say in your post that if someone really wants another option to choose from, they should comment on it and you'll add it after.
Plan a Live post
Another great tip for nurturing your Facebook Group is to create Live Posts. Just like in Live Facebook, you can create Live Posts in a Facebook Group. The difference is that only the members will be able to see it (if the group is secret, or closed).
This type of communication is good if you want to present or teach your members about something if you want to show them how to do's. It's a great way to let them know you better and to make them realize you are actually a person, one that's involved.
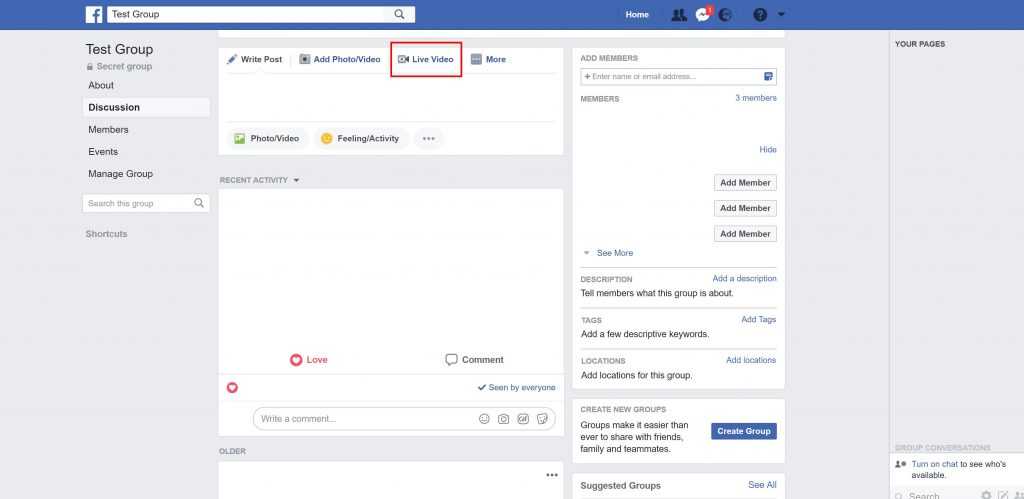
How to create a Live Post?
Simply go in your group and select Live Video, just as in the picture below.
This will appear:
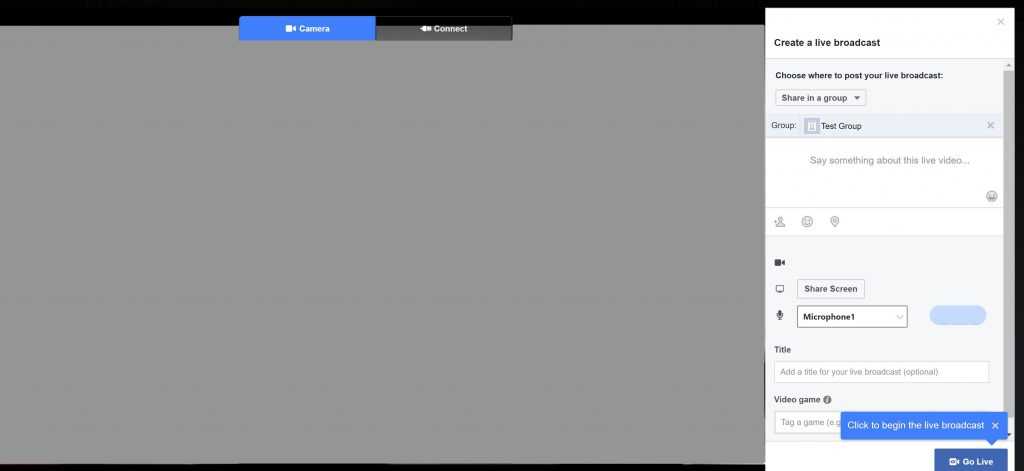
Just know that you can share this live video in your group, on your timeline or in an event.
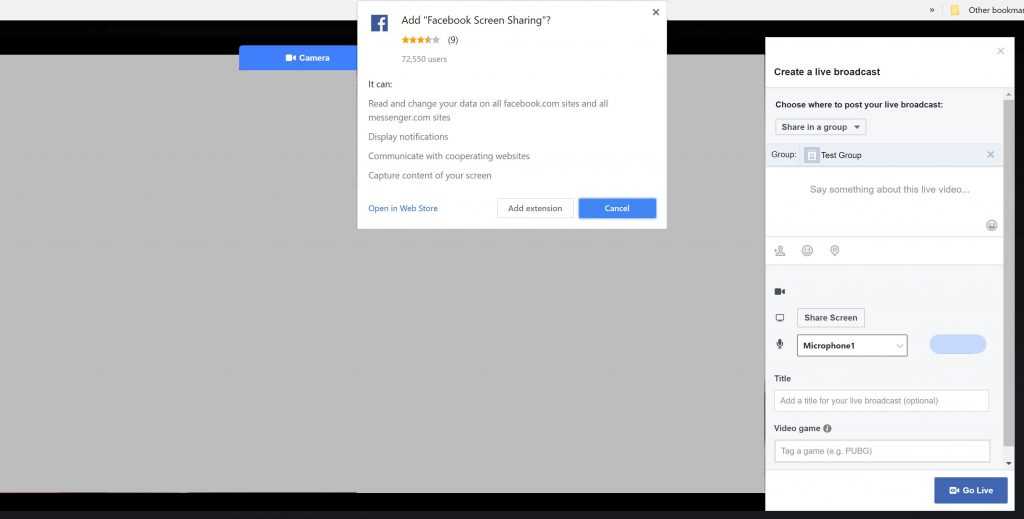
There is the option to Share Screen right under the input text area of ‘Say something about this live video'. Click on that and a pop-up will appear, saying that you need to have a Chrome extension called ‘Facebook Screen Sharing'.
If you own a Video Games Facebook Group, or a Sports one, the Connect feature can come in handy. Just click on the Connect button right next to the Camera button, and this window will appear:
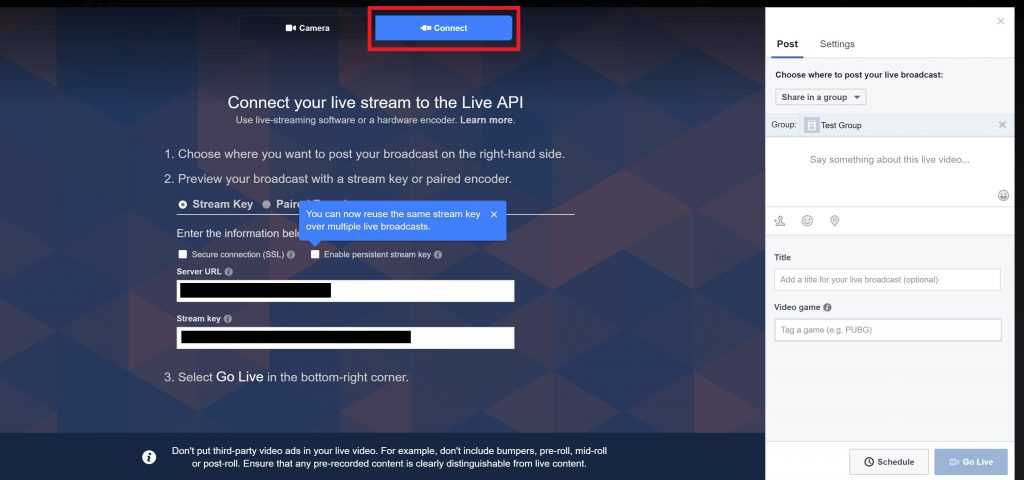
Read the instructions, and set up your Live Broadcast. You can then Schedule this Live Video or Go Live directly. If you choose to Schedule a Live Video, you'll see a pop-up that details this action.
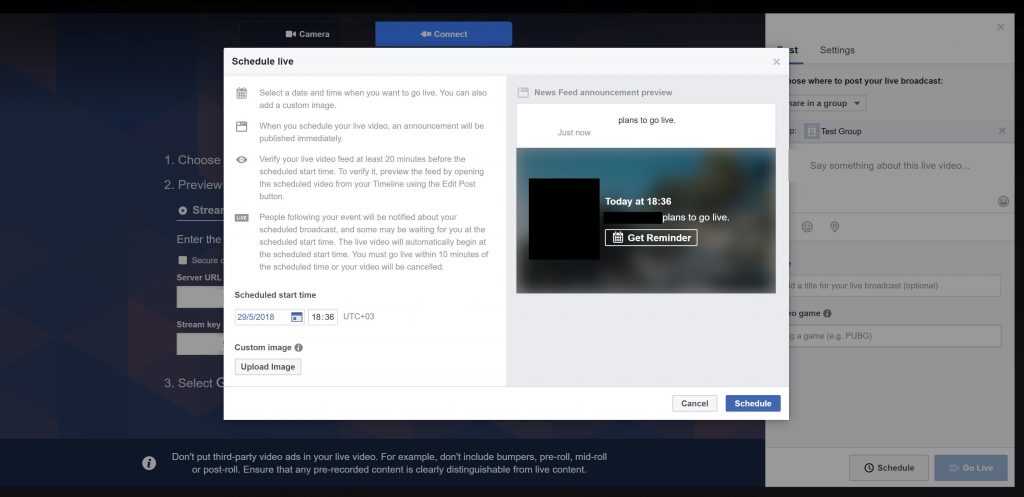
Live Video - 11 tips for growing a facebook group
See that Facebook does something for you: it automatically creates a Newsfeed announcement, where people can click to Get a reminder. You can upload a custom image to this announcement.
Facebook tells you that you should start your broadcast within 10 minutes of the scheduled time, otherwise the broadcast will be canceled. It also advises you to check your video feed at least 20 minutes before the scheduled time.
Also here in the Connect part, you can do some extra Settings.
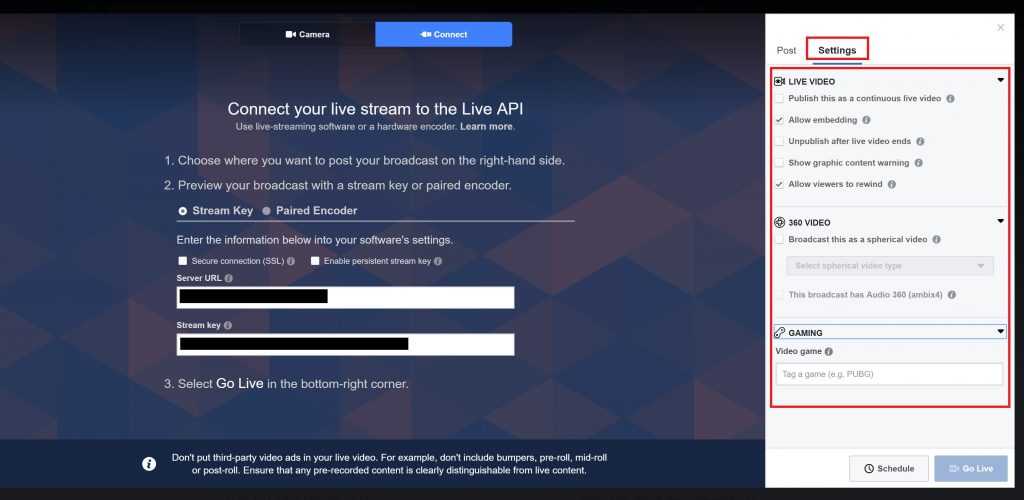
See that you can choose from the following list. Each of these has its own purpose, and its own settings:
- Live Video – comes with 5 selections that you can choose from.
- Publish this as a continuous live video – If you select this, your video will be deleted as soon as the broadcast will end.
- Allow embedding – Speaks for itself, but you can select this if you want to embed your Live Video on third-party apps
- Unpublish after the live video ends – You know that unpublished posts mean that they are not visible to the public. Just to know, you'll still be able to see the insights of that particular post
- Show graphic content warning – If you Live Video broadcasts something that isn't suitable for under aged children, select this and the auto-play function will not be available. Instead, there will be a cover that warns people about the graphic content.
- Allow viewers to rewind – While you are live, your viewers will be able to rewind, just in case they missed something you said
- 360 Video – comes with 2 selections:
- Broadcast this video as a spherical video – If you have a 360-degree camera, tick this selection. You'll then be able to choose from 3 options: 360 Video Standard, 360 Video 3D, and 360 Video Cubemap. After choosing, you'll be able to tick or not the second selection
- This Broadcast has Audio360 (ambix4) – tick this only if the audio format of your video is ambix4.
This type of video is well suited for those that want to broadcast doing some kind of sports or traveling.
- Video Game – here you can input the game you're playing. A great option for those that own a Video Game Facebook Group and want to broadcast whatever they are playing.
To make sure that you'll have a big audience, plan to tell your members, and remind them that you are going to go Live on a particular day. Ten days notice should be just fine: not too long for them to get annoyed by the reminders, not too short for them to not be able to plan to watch your Live Facebook Group Broadcast.
Post resources of any kind
This idea is similar to posting about various topics. You can create a special thread, by adding a hashtag like ‘SharingResource' or by choosing a certain day and making it the day everybody shares resources of any kind.
I would use the hashtag option, because I may forget about a resource I found on Monday, and the day of sharing is on Friday. Using the hashtag option lets members find much easier those particular posts, and lets everybody share what they found, the moment they found it. Of course, you are free to experiment with this and adapt it to your group.
The main interest of your members is what it gathered them all in your group. But they have other interests, and you can encourage talking about them, as long as they will not overdo it. You don't want to transform your Facebook Group into something else.
It's a great way to grow and nurture your Facebook Group, as members will encourage their friends and acquaintances to join your group: ‘Hey, I'm in this great Facebook Group! It's mainly about Social Media, but there are so many experienced people that can help you with just about anything. Oh, and the resources they share…Great variety!'
One thing I would like to mention is that along with sharing the resource, they should explain a bit how they helped them or why did they choose to share that particular resource.
Add tags to your group
Adding tags to your Facebook Group is more for helping others find your group. You can add up to 5 tags, and here's how:
How to add tags?
In the left part of your group window, there is a link ‘Add Tags'. Click on it and add the tags.

Try thinking of tags that can best represent your group. Do some brainstorming and think like this: if you would have been the one searching for your group, what would you have searched for? Think of all the possibilities; make a list and start searching. Narrow that list with keeping only the Facebook Group tags that got you exactly where you wanted.
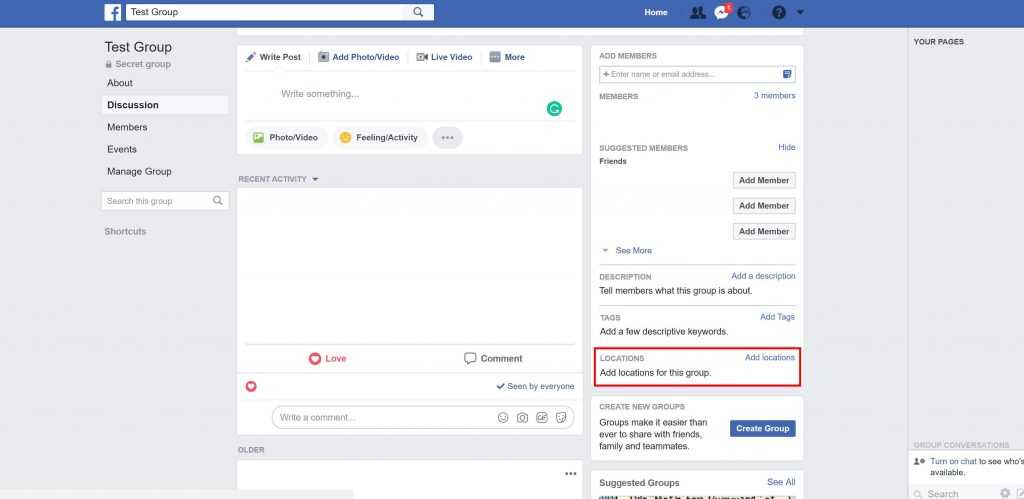
Add a location to your group (if a local one)
Some Facebook Group owners want their group to be a local one. It's a great choice if you are also organizing meetings with your members or other face-to-face activities. If someone is searching for a group in your area, you should be there, listed.
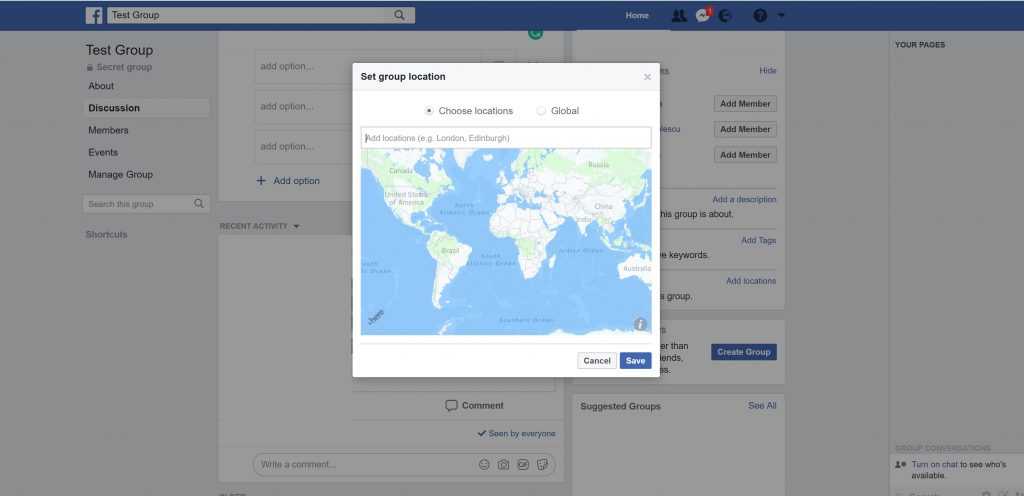
How to add a location?
In the right part of your group, there is a link ‘Add Location'. Click on it and then write in the window the locations you want. You can choose also choose Global, or you can also add multiple locations.
Customize your Facebook Group URL
Another easy things to do so that new members will find you easily is to customize your group's URL.
Do this by going into Edit Group Settings, and scroll down to the Web and Email address.
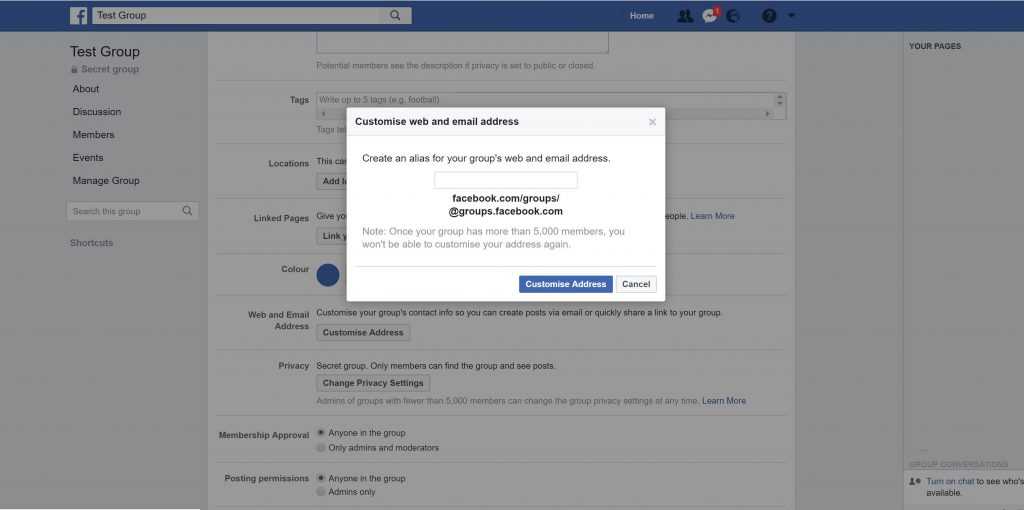
Think of an alias that you will not want to change in the future. If your group reaches more than 5000 members, you won't be able to change it.
That is all we had for today. I presented you some tips about growing a Facebook Group. Some of the tips are purely on the setting part (adding a location, adding tags to your Facebook Group, setting up a Live Video), some concern you, as the admin (being involved, sharing resources, and using reminders, and so on).